
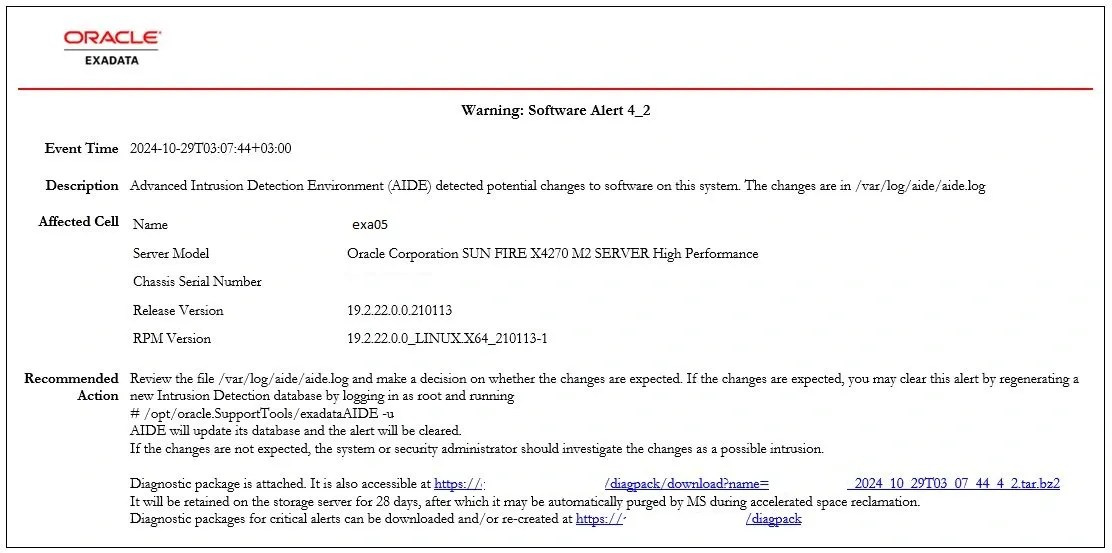
INTRO : File System Corruption on root partition
AIDE (Advanced Intrusion Detection System) alerted us to the changes it detected in the file system, including some files and a folder.
The Pacific directory under /usr/share/zoneinfo/posix/ and 3-4 individual files at the same directory level had their group IDs changed from root to exawatch. Initially, I thought we could fix them just using chown command. However, we have no clear information about the root cause.
First, we investigated the /var/log/messages file. Here is the related section from it.
[root@exacel05 posix]# vi /var/log/messages
	...
	Oct 25 03:06:09 exacel05 systemd: Started LSB: Monitors LSI MegaRAID health..
	Oct 25 03:06:32 exacel05 kernel: sd 0:2:1:0: [sdb] tag#10 FAILED Result: hostbyte=DID_OK driverbyte=DRIVER_SENSE
	Oct 25 03:06:32 exacel05 kernel: sd 0:2:1:0: [sdb] tag#10 Sense Key : Medium Error [current]
	Oct 25 03:06:32 exacel05 kernel: sd 0:2:1:0: [sdb] tag#10 Add. Sense: Unrecovered read error
	Oct 25 03:06:32 exacel05 kernel: sd 0:2:1:0: [sdb] tag#10 CDB: Read(10) 28 00 43 1b bd 56 00 00 08 00
	Oct 25 03:06:32 exacel05 kernel: blk_update_request: critical medium error, dev sdb, sector 1125891414
	Oct 25 03:06:32 exacel05 kernel: md/raid1:md5: sdb5: rescheduling sector 16779816
	Oct 25 03:06:32 exacel05 kernel: md/raid1:md5: redirecting sector 16779816 to other mirror: sdl5
	Oct 25 03:07:01 exacel05 kernel: EXT4-fs error (device md5): ext4_iget:4315: inode #529114: comm aide: bad extended attribute block 43144908050815
	Oct 25 03:07:01 exacel05 kernel: EXT4-fs error (device md5): ext4_iget:4315: inode #529114: comm aide: bad extended attribute block 43144908050815
	Oct 25 03:07:30 exacel05 kernel: EXT4-fs (sdm1): mounted filesystem with ordered data mode. Opts: (null)
	Oct 25 03:07:31 exacel05 kernel: EXT4-fs (sdm1): mounted filesystem with ordered data mode. Opts: (null)
	Oct 25 03:07:54 exacel05 kernel: EXT4-fs error (device md5): ext4_iget:4315: inode #529114: comm updatedb: bad extended attribute block 43144908050815
The first error in /var/log/messages is logged at 03:06 – the Medium Error seems to indicate a hardware problem. Despite being part of a RAID structure, an error occurred related to a block. Alternatively, this error might have been occurred before but detected at 03:06 during a health check of the RAID and storage system (LSB: Monitors LSI MegaRAID health). This agent works with the exawatch user. (Oracle® Exadata Database Machine Security Guide for Exadata Database Machine (Version 19)). This agent runs periodically every day, and its activity is logged in /var/log/messages.
We decided to delete the problematic folder (Pacific directory) and transferring it from another storage server, as well as fixing the files by changing their ownership. However, it didn’t seem that simple. The ls and rm commands in the relevant directory are resulting with an ‘Input/output error’.
[root@exacel05 posix]# ls -ls
ls: cannot access Pacific: Input/output error
total 252

 4 -rw-r--r--  4 root root     2427 Jan  4  2021 Navajo
 4 -rw-r--r--  4 root root     2434 Jan  4  2021 NZ
 4 -rw-rw----  1 root exawatch 1542 Oct 22 00:16 NZ-CHAT
 ? d?????????  ? ?    ?           ?            ? Pacific
 4 -rw-r--r--  2 root root     2679 Jan  4  2021 Poland
 4 -rw-r--r--  2 root root     3455 Jan  4  2021 Portugal
 4 -rw-r--r--  5 root root      556 Jan  4  2021 PRC
 4 -rw-r--r--  1 root root     2294 Jan  4  2021 PST8PDT
 4 -rw-r--r--  2 root root      764 Jan  4  2021 ROC
 4 -rw-r--r--  2 root root      645 Jan  4  2021 ROK
 4 -rw-r--r--  2 root root      384 Jan  4  2021 Singapore
When the ls and rm commands are run, the following messages are recorded in /var/log/messages.
[root@exacel05 posix]# vi /var/log/messages
	...
	Oct 25 08:19:07 exacel05 kernel: EXT4-fs error (device md5): ext4_iget:4315: inode #529114: comm bash: bad extended attribute block 43144908050815
	Oct 25 08:19:09 exacel05 kernel: EXT4-fs error (device md5): ext4_iget:4315: inode #529114: comm rm: bad extended attribute block 43144908050815
	Oct 25 08:19:09 exacel05 kernel: EXT4-fs error (device md5): ext4_iget:4315: inode #529114: comm rm: bad extended attribute block 43144908050815
	Oct 25 08:19:11 exacel05 kernel: EXT4-fs error (device md5): ext4_iget:4315: inode #529114: comm ls: bad extended attribute block 43144908050815
	Oct 25 08:19:17 exacel05 kernel: EXT4-fs error (device md5): ext4_iget:4315: inode #529114: comm ls: bad extended attribute block 43144908050815
There is a problem with the file/inode #529114.
The solution is to perform a file system check. But how? To run fsck, the relevant file system must be unmounted. This operation can easily be done by unmounting separate file systems, except for / and /boot while the server is running. However, the difficult part is performing this while the server is running from the / file system.
The first thing that comes to mind for this operation is to mount a CD ISO of the same version as the server’s current operating system (in this case, Oracle Linux 7.9) and run the necessary commands. However, things change when the server is an Exadata. For Exadata servers, diag.iso should be used, but this image file is no longer available. In older versions, the /opt/oracle.SupportTools/diagnostic.iso file was present in the relevant directory, could be copied from the server, and booted from it via the ILOM web interface or KVM connection. However, over time, the diag.iso file’s role shifted to the internal USB. In fact, this is evolving further. For storage servers, the internal USB has now been replaced with M.2 SSDs in newer Exadata versions, such as X7.
With a quick search on My Oracle Support I found the document “1947114.1 How to boot Exadata database server with diagnostic ISO image” . This document is for compute nodes (DB nodes), but for cells, it indicates that, without the diagnostic CD, the image from the internal USB (CELL_USB_BOOT_CELLBOOT_usb_in_recue_mode) can be used. To do this, you need to select the CELL_USB_BOOT_CELLBOOT_usb_in_recue_mode boot option from the bottom of the GRUB menu during boot. However, neither in the Exadata Maintenance Guide, Oracle Support, nor on any blog sites have we found example outputs related to recovery operations after this option is selected. Typically, after using this menu option, cell reconfigurations are performed. Most of the available content focuses on reimaging processes. I looked for a simpler solution, and decided to use this as a last resort if I couldn’t find another solution.
We decided to use the old method by using diag.iso. However, we couldn’t find it either. It is no longer available and downloadable in Oracle Support. We then decided to try the ISO of our own server’s image. However, it’s not available in 888828.1 either, as it has been removed due to the Exadata X2-2 Servers being ancient. From the old update readme (2715399.1), we found the patch numbers:
Patch 31950027: Storage cell ISO Image (19.2.20.0.0.21118)
Patch 31950032: Diagnostic ISO Image (19.2.20.0.0.21118)
Although we have the license, neither can be downloaded as they both require a password. An SR can be opened to request them. But before opening an SR, we preferred to try our own methods. Not at that time but later, I discovered an important piece of information: According to the document Exadata: How to locate and download the ISO patch needed for reimaging DB and cell nodes (Doc Id 2875126.1), these images can also be downloaded by searching for ‘All Categories – Exadata ISO’ at the following link: Oracle Software Delivery Cloud.
Since i could not find an ISO immediately, I shifted my focus to the idea of whether this operation can be performed without a CD or ISO.
Option 1: Force the server to run the fsck operation during the next boot. Create a file under the (/) root file system using the touch command.
[root@exacel05 posix] touch /forcefsck
[root@exacel05 posix] reboot now
[root@exacel05 posix] vi /var/log/messages
	...
	Oct 28 08:27:26 exacel05 systemd-fsck: Please pass 'fsck.mode=force' on the kernel command line rather than creating /forcefsck on the root file system.
	Oct 28 08:27:26 exacel05 systemd-fsck: Please pass 'fsck.mode=force' on the kernel command line rather than creating /forcefsck on the root file system.
	Oct 28 08:27:26 exacel05 systemd-fsck: Please pass 'fsck.mode=force' on the kernel command line rather than creating /forcefsck on the root file system.
	...
This no longer works; the system doesn’t accept it anymore and instead directs us to use another solution, which involves passing ‘fsck.mode=force’ on the kernel command line.
Option 2: Rebuild the GRUB configuration and force the operation. We added the options fsck.mode=force and fsck.repair=yes.
We referred to the document Doc Id 2833411.1 – How to Perform fsck of Root (/) on an Exadata Domu OL7 Instance as our reference. Although it is an OCI note, we found it applicable between OL6 and OL8 versions.
[root@exacel05 posix]# ls -ls /boot/grub2/grub.cfg
	8 -rw------- 1 root root 7729 May 30  2022 /boot/grub2/grub.cfg

[root@exacel05 posix]#  cat /boot/grub2/grub.cfg
	########### BEGIN DO NOT REMOVE Added by Oracle Exadata ###########
	GRUB_DEFAULT=0
	GRUB_DISABLE_OS_PROBER=true
	GRUB_DISABLE_RECOVERY=true
	GRUB_DISABLE_SUBMENU=y
	GRUB_DISTRIBUTOR="Oracle Linux"
	GRUB_TIMEOUT=5
	GRUB_TIMEOUT_STYLE=menu
	GRUB_TERMINAL="console serial"
	GRUB_SERIAL_COMMAND="serial --speed=115200 --unit=0 --word=8 --parity=no --stop=1"
	GRUB_CMDLINE_LINUX_DEFAULT="root=/dev/md5 bootarea=c0d0 bootfrom=CELLBOOT ro loglevel=7 panic=60 pci=noaer log_buf_len=1m nmi_watchdog=0 transparent_hugepage=never rd_NO_PLYMOUTH crashkernel=448M@128M audit=1 console=tty1 console=ttyS0,115200n8 numa=off intel_idle.max_cstate=0 processor.max_cstate=1 rd.auto=1 ifnames_skip=100 biosdevname=0 net.ifnames=0 fsck.mode=force fsck.repair=yes"
	########### END DO NOT REMOVE Added by Oracle Exadata ###########

[root@exacel05 posix]# grub2-mkconfig -o /boot/grub2/grub.cfg

[root@exacel05 posix]  vi /var/log/messages
	...
	Oct 28 08:31:17 exacel05 systemd: Found device /dev/md5.
	Oct 28 08:31:17 exacel05 systemd: Starting File System Check on /dev/md5...
	Oct 28 08:31:17 exacel05 systemd-fsck: CELLSYS contains a file system with errors, check forced.
	Oct 28 08:31:17 exacel05 systemd-fsck: CELLSYS: Inode 529114 is in use, but has dtime set.  FIXED.
	Oct 28 08:31:17 exacel05 systemd-fsck: CELLSYS: Inode 529114 has illegal block(s).
	Oct 28 08:31:17 exacel05 systemd-fsck: CELLSYS: UNEXPECTED INCONSISTENCY; RUN fsck MANUALLY.
	Oct 28 08:31:17 exacel05 systemd-fsck: (i.e., without -a or -p options)
	Oct 28 08:31:17 exacel05 systemd-fsck: fsck failed with error code 4.
	Oct 28 08:31:17 exacel05 systemd-fsck: Running request emergency.target/start/replace
That was a good attempt. It detected the file system corruption and tried to fix it, but it wasn’t fully resolved; there are still inconsistencies in inode 529114. We have reverted back the grub configuration to its default.
Now, we will focus our efforts on manually running the process. There is another method.
Option 3: During boot, you can press e on the GRUB2 menu screen to edit the boot parameters and boot into single-user mode (rescue mode) or emergency mode, then run fsck.
In detail, this is well explained in the document Doc Id 2153996.1 – How to Boot Oracle Linux 7 Into Rescue and Emergency Modes via systemd. I was able to test the xfs_repair operation for the XFS file system using this method on my test environment with virtual machines. After pressing e (selecting edit), you can add the systemd.unit=emergency.target or single command to boot in the desired mode. However, when we tried this on Exadata, after pressing e to edit the boot parameters, it asked for a password. When I entered the root username and password, it returned to the menu. There is a document on this as well. Apparently, they require a password for the GRUB menu for the benefit of customers 🙂 To avoid tampering.
Explanation is available on Why Password Required to Boot Exadata Compute Node in Single User Mode (Doc Id 1490110.1).
Option 4: Fix it or Die Tryin’. We don’t have the diagnostic CD. We don’t have the storage server ISO. So, what do we have? Our server is running Oracle Linux 7.9. We have this CD available. Can’t we boot from an Operating system iso and run fsck? Of course, we can.
[root@exacel05 posix]# cat /etc/oracle-release
Oracle Linux Server release 7.9
Is the method we’re considering a documented methodology?
Yes, we reached this information by reading through the documentation. But we came across it in an unrelated place. If you’re going to perform an operation, you need to research the topic thoroughly. Here it is.
According to the Doc ID 2791386.1 Oracle Linux: Exadata Cell Node Failed to Boot Up “Dependency Failed for /boot.”, to perform operations in rescue boot, you can either use the CELL_USB_BOOT_CELLBOOT_usb_in_rescue_mode boot menu, or according to the “How to Boot Oracle Linux 5.x into Rescue Mode” (Doc ID 1516777.1) document, you can perform operations using diag.iso or even a regular Linux installation ISO. Yes, we have verified this information in the end.
Now it’s time to proceed. Based on the more recent version of Doc ID 1516777.1, “How to boot up Oracle Linux 7.x into Rescue Mode from ISO Image (Doc ID 2302734.1)” and How to boot Exadata database server with diagnostic ISO image Doc Id 1947114.1, we are starting the recovery operation.
Connecting to ILOM Web Interface:
We connected to the ILOM web interface and selected Remote Control > Redirection > Storage Redirection > Launch Service and Launch Remote Console. This downloads a java file. We ran the downloaded Java file. At this stage, while attaching the Oracle Linux 7.9 CD to the virtual cd-rom, we received the error “Storage Redirection Not Supported with 64-bit JRE.”
According to the Oracle ILOM 3.0 HTML Documentation Collection, the solution suggested was to install a 32-bit JRE. I installed the 32-bit version using the older jre-8u241-windows-i586.exe setup and this time i could attach it succesfully.
Mounting the ISO File:
From the Devices > Cdrom menu, OracleLinux-R7-U9-Server-x86_64-dvd.iso file is attached from my computer.
SSH into ILOM for changing Next Boot preference :
Entered commands below to ensure that the next boot would be from the CD-ROM.
[root@exadb01 ~]# ssh exacel05-ilom
Oracle(R) Integrated Lights Out Manager

Version 3.2.11.20.b r126286

Copyright (c) 2018, Oracle and/or its affiliates. All rights reserved.

Warning: HTTPS certificate is set to factory default.

Hostname: exacel05-ilom

-> set /HOST boot_device=cdrom
-> start /SP/console/
Are you sure you want to start /SP/console (y/n)? y
Now it is time to be quick, we will stop the running services and reboot the server.
SYS@+ASM1> select * from v$asm_attribute where name like '%failgroup_repair_time%' Diskgroup has a failgroup repair time of 24 hours. Since I shut down the entire server, we are counting the duration backwards from the failgroup repair time. If only one disk had been removed, we would count from the disk repair time of 12 hours instead. These values can also be modified if the process takes longer.
CellCLI> list griddisk attributes name,status,asmmodestatus,asmdeactivationoutcome
CellCLI> alter griddisk all inactive;
CellCLI> alter cell shutdown services all
[root@exacel05 posix]# reboot now
Running fsck manually on Exadata storage server :
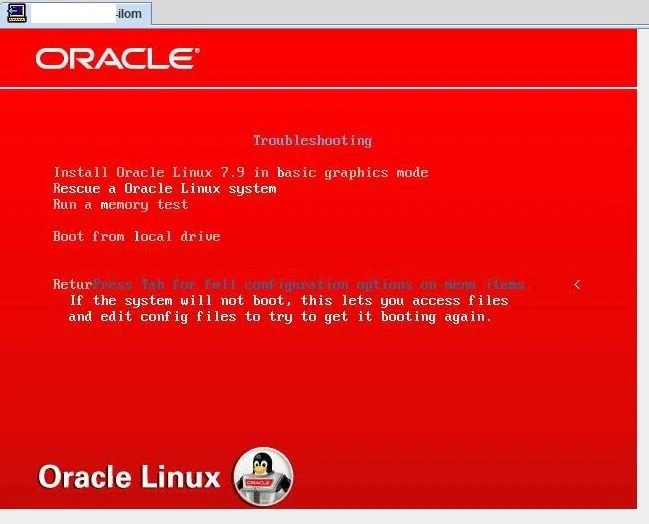
After reboot command, the server booted from Cd-rom.
Step 1: Choose Troubleshooting

Step 2: Rescue a Oracle Linux System
Step 3: Mount the root partition (/) with the read-only option and check it using the mount command

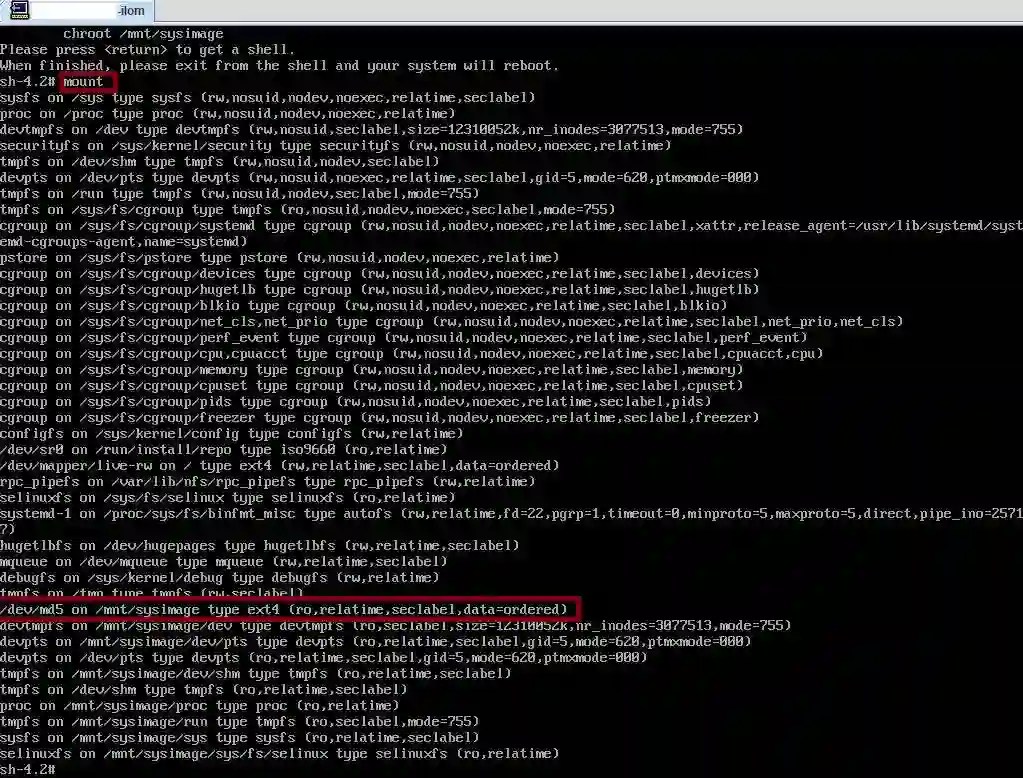
Step 4: Change root directory and run file system check with fsck command
You may also run fsck command with -y option to always attempt to fix any detected filesystem corruption automatically without asking for approval.

If there are too many corrupted files, you may need to respond with ‘y’ for each of them.

Voila. It has been completed succesfully. Exit and reboot the server and activate all grid disks. Now it is time to check related files and directories.
CellCLI> alter griddisk all active;

-- Check the directory where corruption detected
[root@exacel05 posix]# ls -ls
...
4 -rw-r--r--  3 root root     2434 Jan  4  2021 NZ
4 -rw-rw----  1 root exawatch 1542 Oct 22 00:16 NZ-CHAT
4 drwxr-xr-x  2 root root     4096 Jan 14  2021 Pacific
4 -rw-r--r--  2 root root     2679 Jan  4  2021 Poland
4 -rw-r--r--  2 root root     3455 Jan  4  2021 Portugal
4 -rw-r--r--  5 root root      556 Jan  4  2021 PRC
4 -rw-r--r--  1 root root     2294 Jan  4  2021 PST8PDT
4 -rw-r--r--  2 root root      764 Jan  4  2021 ROC
In this case, the Pacific directory was listed with ?? before the fsck command was run. It is now fixed. There were also ownership and linkcount differences under the related directory when compared to another storage server. We manually corrected these by copying from another server.
For example, the NZ-CHAT file’s owner group is ‘exawatch’ when it should be ‘root’. I used the command provided below to detect all the hardlinks for such files.
-- Detect all hard links refering to same file on another server
[root@exacel06 posix]#  find / -type f -samefile /usr/share/zoneinfo/posix/NZ-CHAT
/usr/share/zoneinfo/posix/NZ-CHAT
/usr/share/zoneinfo/posix/Pacific/Chatham
I copied one of them from other server and created hard links files with the sample command provided below.
--Delete the files with different linkcounts on the cell where fsck run.
[root@exacel05 posix]# rm -f /usr/share/zoneinfo/posix/NZ-CHAT
[root@exacel05 posix]# rm -f /usr/share/zoneinfo/posix/Pacific/Chatham

-- copy from another cell
[root@exacel06 posix]# scp /usr/share/zoneinfo/posix/NZ-CHAT exacel05:/usr/share/zoneinfo/posix/NZ-CHAT

-- create hard links again.
[root@exacel05 posix]# ln /usr/share/zoneinfo/posix/NZ-CHAT  /usr/share/zoneinfo/posix/Pacific/Chatham

-- Check if everything is fine.
[root@exacel06 posix]#  ls -lsthr | wc
61     602    3452

[root@exacel05 posix]# ls -lsthr | wc
61     602    3212
Problem solved. Aide configuration database is updated to be aware of latest changes.
[root@exacel05 posix]# /opt/oracle.SupportTools/exadataAIDE -u
AIDE: database update request accepted.
Conclusion :
In this case of file system corruption on the root (/) partition of an Exadata storage server running on Oracle Linux 7, we encountered significant challenges in identifying and resolving the issue. The corruption was initially discovered by AIDE, which detected changes in file attributes that required detailed analysis. After analyzing logs, we discovered filesystem errors and inode inconsistencies that required a thorough recovery process.
The traditional approach of using diagnostic ISO images was not possible, and we were unable to find a straightforward recovery method due to the unique constraints of Oracle Engineered Exadata systems. Despite these setbacks, we tried several alternative approaches, including modifying GRUB configurations, booting into rescue mode and eventually using an Oracle Linux 7.9 installation ISO to manually perform a file system check (fsck).
By following important documentation and combining all the related information with the appropriate tools, we were able to successfully repair the corrupted file system and restore normal operation to the server. This incident also showed us the necessity of having proper diagnostic tools and ISO images readily available for Exadata systems and the need to adapt quickly when standard solutions are not accessible.
Hope it helps.

Leave your comment